how to monitor Xerox Phaser 7400DN printer with icinga

With this useful plugin you can monitor easily your network printer.Download and move it to directory with the other plugins.In my case the directory is /usr/lib/nagios/plugins/.Make sure the snmp is configured on the printer side.Now, lets’ test the plugin root@icinga:/usr/lib/nagios/plugins# ./check_snmp_printer -H 192.168.0.75 -x "MODEL"
"Xerox Phaser 7400DN;PS4.2.0,Net25.72.10.07,Eng0.11.2,OS6.26", Serial # XXXXXXXXX

Icinga-Printer
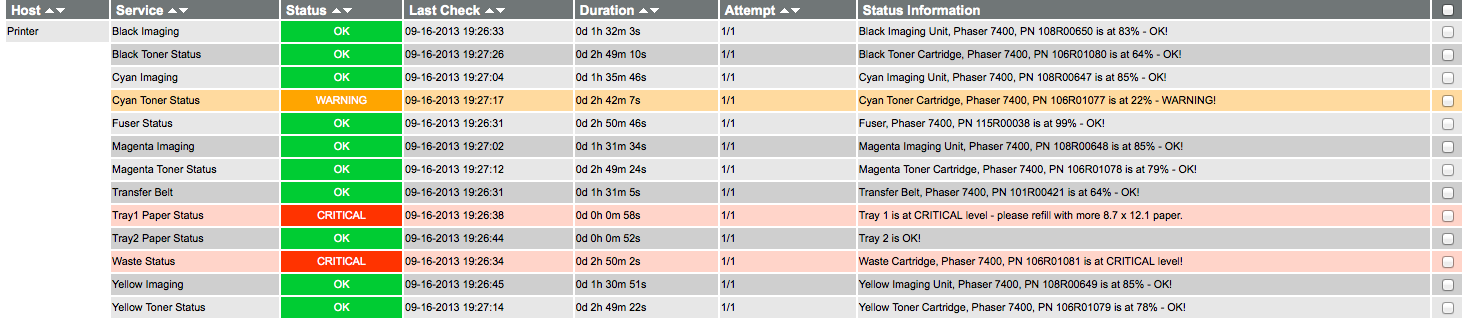
Now, we have to define host, check_command and services for our new object.
root@icinga:/usr/local/icinga/etc# vim objects/Default_collector/hosts.cfg
define host {
host_name Printer
address 192.168.0.75
max_check_attempts 1
check_interval 1
retry_interval 1
notification_interval 1
notification_options d,n
check_command check-host-alive
check_period 24x7
notification_period 24x7
contact_groups +admins
}

root@icinga:/usr/local/icinga/etc# vim objects/global/checkcommands.cfg

define command{
command_name check_consumables
command_line $USER1$/check_snmp_printer -H $ARG1$ -C public -x $ARG2$ -w 30 -c 15
}

define command{
command_name check_paper
command_line $USER1$/check_snmp_printer -H $ARG1$ -C public -x $ARG2$
}

root@icinga:/usr/local/icinga/etc# vim objects/Default_collector/services.cfg


define service{
use generic-service
host_name Printer
service_description Tray1 Paper Status
check_command check_paper!$HOSTADDRESS$!"TRAY 1"
check_period 24x7
notification_period 24x7
max_check_attempts 1
check_interval 1
retry_interval 1
notification_interval 1
event_handler_enabled 0
contact_groups +admins
}
define service{
use generic-service
host_name Printer
service_description Tray2 Paper Status
check_command check_paper!$HOSTADDRESS$!"TRAY 2"
check_period 24x7
notification_period 24x7
max_check_attempts 1
check_interval 1
retry_interval 1
notification_interval 1
event_handler_enabled 0
contact_groups +admins
}

define service{
use generic-service
host_name Printer
service_description Black Toner Status
check_command check_consumables!$HOSTADDRESS$!”CONSUM Black Toner”
check_period 24×7
notification_period 24×7
max_check_attempts 1
check_interval 1
retry_interval 1
notification_interval 1
event_handler_enabled 0
contact_groups +admins
}
define service{
use generic-service
host_name Printer
service_description Cyan Toner Status
check_command check_consumables!$HOSTADDRESS$!”CONSUM Cyan Toner”
check_period 24×7
notification_period 24×7
max_check_attempts 1
check_interval 1
retry_interval 1
notification_interval 1
event_handler_enabled 0
contact_groups +admins
}

define service{
use generic-service
host_name Printer
service_description Magenta Toner Status
check_command check_consumables!$HOSTADDRESS$!”CONSUM Magenta Toner”
check_period 24×7
notification_period 24×7
max_check_attempts 1
check_interval 1
retry_interval 1
notification_interval 1
event_handler_enabled 0
contact_groups +admins
}
define service{
use generic-service
host_name Printer
service_description Yellow Toner Status
check_command check_consumables!$HOSTADDRESS$!”CONSUM Yellow Toner”
check_period 24×7
notification_period 24×7
max_check_attempts 1
check_interval 1
retry_interval 1
notification_interval 1
event_handler_enabled 0
contact_groups +admins
}

define service{
use generic-service
host_name Printer
service_description Fuser Status
check_command check_consumables!$HOSTADDRESS$!”CONSUM Fuser”
check_period 24×7
notification_period 24×7
max_check_attempts 1
check_interval 1
retry_interval 1
notification_interval 1
event_handler_enabled 0
contact_groups +admins
}
define service{
use generic-service
host_name Printer
service_description Waste Status
check_command check_consumables!$HOSTADDRESS$!”CONSUM Waste”
check_period 24×7
notification_period 24×7
max_check_attempts 1
check_interval 1
retry_interval 1
notification_interval 1
event_handler_enabled 0
contact_groups +admins
}

define service{
use generic-service
host_name Printer
service_description Cyan Imaging
check_command check_consumables!$HOSTADDRESS$!”CONSUM Cyan Imaging”
check_period 24×7
notification_period 24×7
max_check_attempts 1
check_interval 1
retry_interval 1
notification_interval 1
event_handler_enabled 0
contact_groups +admins
}
define service{
use generic-service
host_name Printer
service_description Magenta Imaging
check_command check_consumables!$HOSTADDRESS$!”CONSUM Magenta Imaging”
check_period 24×7
notification_period 24×7
max_check_attempts 1
check_interval 1
retry_interval 1
notification_interval 1
event_handler_enabled 0
contact_groups +admins
}

define service{
use generic-service
host_name Printer
service_description Yellow Imaging
check_command check_consumables!$HOSTADDRESS$!”CONSUM Yellow Imaging”
check_period 24×7
notification_period 24×7
max_check_attempts 1
check_interval 1
retry_interval 1
notification_interval 1
event_handler_enabled 0
contact_groups +admins
}
define service{
use generic-service
host_name Printer
service_description Black Imaging
check_command check_consumables!$HOSTADDRESS$!”CONSUM Black Imaging”
check_period 24×7
notification_period 24×7
max_check_attempts 1
check_interval 1
retry_interval 1
notification_interval 1
event_handler_enabled 0
contact_groups +admins
}

define service{
use generic-service
host_name Printer
service_description Transfer Belt
check_command check_consumables!$HOSTADDRESS$!”CONSUM Transfer Belt”
check_period 24×7
notification_period 24×7
max_check_attempts 1
check_interval 1
retry_interval 1
notification_interval 1
event_handler_enabled 0
contact_groups +admins
}

root@icinga:/usr/lib/nagios/plugins# service icinga reload
Running configuration check...OK
Reloading icinga configuration...done

how to reset root password on debian wheezy

During the pc boot up process, when grub boot loader appears press “e” to edit,
find the line which begin with linux and on the end add init=/bin/bash

example: linux /boot/vmliznu-3.2.0-4-686-pae root=UUID=8cbe7996-107b-4d22-9281-f0962e4917dd ro initrd=/install/initrd.gz quiet init=/bin/bash

press ctrl+x to boot, this will drop you on the command prompt

mount -o remount,rw /

passwd

reboot

configure zimbra firewall howto

[root@mail ~]# cat /etc/sysconfig/iptables
# Firewall configuration written by system-config-firewall
# Manual customization of this file is not recommended.
*filter
:INPUT ACCEPT [0:0]
:FORWARD ACCEPT [0:0]
:OUTPUT ACCEPT [0:0]
-A INPUT -m state –state ESTABLISHED,RELATED -j ACCEPT
-A INPUT -p icmp -j ACCEPT
-A INPUT -i lo -j ACCEPT
-A INPUT -m state –state NEW -m tcp -p tcp -s 46.35.160.170/32 –dport 22 -j ACCEPT
-A INPUT -m state –state NEW -m tcp -p tcp -s 0/0 –dport 22 -j REJECT
-A INPUT -m state –state NEW -m tcp -p tcp –dport 80 -j ACCEPT
-A INPUT -m state –state NEW -m tcp -p tcp –dport 53 -j ACCEPT
-A INPUT -m state –state NEW -m udp -p udp –dport 53 -j ACCEPT
-A INPUT -m state –state NEW -m tcp -p tcp –dport 110 -j ACCEPT
-A INPUT -m state –state NEW -m tcp -p tcp –dport 443 -j ACCEPT
-A INPUT -m state –state NEW -m tcp -p tcp –dport 25 -j ACCEPT
-A INPUT -m state –state NEW -m tcp -p tcp –dport 143 -j ACCEPT
-A INPUT -m state –state NEW -m tcp -p tcp –dport 993 -j ACCEPT
-A INPUT -m state –state NEW -m tcp -p tcp –dport 389 -j ACCEPT -s 46.35.160.170/32
-A INPUT -m state –state NEW -m tcp -p tcp –dport 465 -j ACCEPT
-A INPUT -m state –state NEW -m tcp -p tcp –dport 587 -j ACCEPT
-A INPUT -m state –state NEW -m tcp -p tcp -s 46.35.160.170/32 –dport 7071 -j ACCEPT
-A INPUT -m state –state NEW -m tcp -p tcp -s 0/0 –dport 7071 -j REJECT
-A INPUT -m state –state NEW -m tcp -p tcp -s 46.35.160.170/32 –dport 7025 -j ACCEPT
-A INPUT -m state –state NEW -m tcp -p tcp -s 0/0 –dport 7025 -j REJECT
-A INPUT -j REJECT –reject-with icmp-host-prohibited
-A FORWARD -j REJECT –reject-with icmp-host-prohibited
COMMIT

RAID bus controller: Dell PowerEdge Expandable RAID controller 4/Di (rev 02)

This is short example how to view raid card and installed hard drives in dell poweredge 1750 server
root@dell:~# lspci -v | grep -i RAID
04:03.0 RAID bus controller: Dell PowerEdge Expandable RAID controller 4/Di (rev 02)
Kernel driver in use: megaraid

root@dell:~# megactl
a0 PERC 4/Di chan:2 ldrv:1 batt:good
a0d0 67GiB RAID 5 1x3 optimal
a0c0t0 33GiB a0d0 online
a0c0t1 33GiB a0d0 online
a0c0t2 33GiB a0d0 online

root@dell:~# megaraid-status
-- Arrays informations --
-- ID | Type | Size | Status
a0d0 | RAID 5 | 67GiB | optimal

-- Disks informations
-- ID | Model | Status | Warnings
a0c0t0 | MAXTOR ATLAS10K4_36SCA 33GiB | online
a0c0t1 | MAXTOR ATLAS10K4_36SCA 33GiB | online
a0c0t2 | MAXTOR ATLAS10K4_36SCA 33GiB | online
root@dell:~#

megacli monitor and configure LSI RAID controller

In this example i am using Debian 7 with raid controller LSI MEGA raid

It is necessary to add repository for the package:

Please add deb http://hwraid.le-vert.net/debian wheezy main to /etc/apt/sources.list

Then apt-get update && apt-get install megacli

megacli is a proprietary tool by LSI which can perform both reporting and management for MegaRAID SAS cards.
However it’s really hard to use because it’s use tones of command line parameters and there’s no documentation.

Gtestet all adapters status and config:
test:~# megacli -AdpAllInfo -aAll
Adapter #0

==============================================================================
Versions
================
Product Name : PERC 5/i Integrated
Serial No : 12345
FW Package Build: 5.2.1-0067

Mfg. Data
================
Mfg. Date : 00/00/00
Rework Date : 00/00/00
Revision No : @A
Battery FRU : N/A

Image Versions In Flash:
================
Boot Block Version : R.2.3.12
BIOS Version : MT28-8
MPT Version : MPTFW-00.10.61.00-IT
FW Version : 1.03.40-0316
WebBIOS Version : 1.03-04
Ctrl-R Version : 1.04-019A
[…]
Logical drive 0 on adapter 0 status and type:
test:~# megacli -LDInfo -L0 -a0
Adapter 0 — Virtual Drive Information:
Virtual Disk: 0 (Target Id: 0)
Name:raid1
RAID Level: Primary-1, Secondary-0, RAID Level Qualifier-0
Size:237824MB
State: Optimal
Stripe Size: 64kB
Number Of Drives:2
Span Depth:1
Default Cache Policy: WriteBack, ReadAheadNone, Direct, No Write Cache if Bad BBU
Current Cache Policy: WriteBack, ReadAheadNone, Direct, No Write Cache if Bad BBU
Access Policy: Read/Write
Disk Cache Policy: Disk’s Default

Exit Code: 0x00

Display, disable or enable automatic rebuild on adapter 0:
test:~# megacli -AdpAutoRbld -Dsply -a0

Adapter 0: AutoRebuild is Enabled.

Exit Code: 0x00
test:~# megacli -AdpAutoRbld -Dsbl -a0

Adapter 0: AutoRebuild is Disabled.

Exit Code: 0x00
test:~# megacli -AdpAutoRbld -Enbl -a0

Adapter 0: AutoRebuild is Enabled.

Exit Code: 0x00

Get and modify rebuild rate:
test:~# megacli -AdpGetProp RebuildRate -a0

Adapter 0: Rebuild Rate = 30%

Exit Code: 0x00
test:~# megacli -AdpSetProp RebuildRate 60 -a0

Adapter 0: Set rebuild rate to 60% success.

Exit Code: 0x00

Show physical disks from first controller:
test:~# megacli -PDList -a0
[…]
Enclosure Device ID: 32
Slot Number: 1
Device Id: 1
Sequence Number: 9
Media Error Count: 0
Other Error Count: 0
Predictive Failure Count: 0
Last Predictive Failure Event Seq Number: 0
PD Type: SAS
Raw Size: 140014MB [0x11177328 Sectors]
Non Coerced Size: 139502MB [0x11077328 Sectors]
Coerced Size: 139392MB [0x11040000 Sectors]
Firmware state: Rebuild
SAS Address(0): 0x5000c5000c8579d1
SAS Address(1): 0x0
Connected Port Number: 1(path0)
Inquiry Data: SEAGATE ST3146855SS S5283LN6CNGM
Foreign State: None
We can see that disk 32,1 (enclosure id = 32, slot = 1) is currently rebuilding (firmware state).
Let’s check this operation progress:
test:~# megacli -PDRbld -ShowProg -PhysDrv [32:1] -aALL

Rebuild Progress on Device at Enclosure 32, Slot 1 Completed 51% in 10 Minutes.

Auhtor:viliev

tw-cli monitor and configure 3ware Raid Controller

In this example i am using Debian 7 with raid controller 3ware 9500S-12 PCI SATA

It is necessary to add repository for the package:

Please add deb http://hwraid.le-vert.net/debian wheezy main to /etc/apt/sources.list

Then apt-get update && apt-get install tw-cli

tw_cli is a command line tool to manage and monitor Eskaled cards

Once the package is installed we can check how the raid works :

List available controllers:
server:~# tw-cli info

Ctl Model (V)Ports Drives Units NotOpt RRate VRate BBU
————————————————————————
c0 9500S-12 2 2 1 0 2 – –

All arrays and disks from controller “c0”:
server:~# tw-cli /c0 show

Unit UnitType Status %RCmpl %V/I/M Stripe Size(GB) Cache AVrfy
——————————————————————————
u0 RAID-1 OK – – – 153.385 OFF –

Port Status Unit Size Blocks Serial
—————————————————————
p0 OK u0 153.38 GB 321672960 VNRD3EC4C7J1SM
p1 OK u0 153.38 GB 321672960 VNRD3EC4C7HZZM

Enabling/Disabling Write Cache
//server> info c0

Unit UnitType Status %RCmpl %V/I/M Stripe Size(GB) Cache AVrfy
——————————————————————————
u0 RAID-1 OK – – – 232.885 OFF –

Write cache is OFF. Let’s turn it ON.
//server> set cache c0 u0 on
Setting Write Cache Policy on /c0/u0 to [on] … Done.

//server> info c0

Unit UnitType Status %RCmpl %V/I/M Stripe Size(GB) Cache AVrfy
——————————————————————————
u0 RAID-1 OK – – – 232.885 ON –

Author:viliev

resize lvm reiserfs file system

In this example I am using CentOS 6 on lvm.

/dev/sda is the firs hard drive( I had install OS on /dev/sda1 with ext4 file system)
/dev/sdb is my second hard drive ( I had use it for tests)

/*First let’s install reiserfs system utils*/

[root@localhost ~]#rpm –import http://elrepo.org/RPM-GPG-KEY-elrepo.org
[root@localhost ~]#rpm -Uvh http://elrepo.org/elrepo-release-6-4.el6.elrepo.noarch.rpm
[root@localhost ~]#yum update
[root@localhost ~]#yum install kmod-reiserfs reiserfs-utils

/*load reiserfs modules in the kernel*/
[root@localhost ~]#modprobe reiserfs

/*list volume groups*/

[root@localhost ~]# lvdisplay
— Logical volume —
LV Path /dev/vg_bentoslack/bentoslack
LV Name bentoslack
VG Name vg_bentoslack
LV UUID TmzPUK-RJKN-xjRd-ydFs-uhaK-C1gk-QBtGvM
LV Write Access read/write
LV Creation host, time bentoslack, 2013-07-03 08:07:59 -0400
LV Status available
# open 1
LV Size 29.80 GiB
Current LE 7629
Segments 1
Allocation inherit
Read ahead sectors auto
– currently set to 256
Block device 253:0

/*create our reiserfs volume group*/

[root@localhost ~]# vgcreate reiserfsVolumeGroup /dev/sdb
Volume group “reiserfsVolumeGroup” successfully created

/*create our logical volume in this volume group*/

[root@localhost ~]# lvcreate -L 9G reiserfsVolumeGroup
Logical volume “lvol0” created

/*make the reiserfs filesystem*/

[root@localhost ~]# mkfs.reiserfs /dev/reiserfsVolumeGroup/lvol0

/*make a mount point*/

[root@localhost ~]# mkdir /mnt/reiserfs
[root@localhost ~]# mount /dev/reiserfsVolumeGroup/lvol0 /mnt/reiserfs/

/*show disk space usage*/

[root@localhost ~]# df -h
Filesystem Size Used Avail Use% Mounted on
/dev/mapper/vg_bentoslack-bentoslack
30G 2.0G 28G 7% /
tmpfs 1.9G 0 1.9G 0% /dev/shm
/dev/sda1 194M 31M 153M 17% /boot
/dev/mapper/reiserfsVolumeGroup-lvol0
9.0G 33M 9.0G 1% /mnt/reiserfs

/*resize reiserfs file system (reduce size) */

[root@localhost ~]# resize_reiserfs -s -3G /dev/reiserfsVolumeGroup/lvol0

/*shrink the logical volume */

[root@localhost ~]# lvreduce -L -3G /dev/reiserfsVolumeGroup/lvol0
ARNING: Reducing active logical volume to 6.00 GiB
THIS MAY DESTROY YOUR DATA (filesystem etc.)
Do you really want to reduce lvol0? [y/n]: y
Reducing logical volume lvol0 to 6.00 GiB
Logical volume lvol0 successfully resized

/*check the disk space usage after the resize operations*/

[root@localhost ~]# mount /dev/reiserfsVolumeGroup/lvol0 /mnt/reiserfs/
[root@localhost ~]# df -h
Filesystem Size Used Avail Use% Mounted on
/dev/mapper/vg_bentoslack-bentoslack
30G 2.0G 28G 7% /
tmpfs 1.9G 0 1.9G 0% /dev/shm
/dev/sda1 194M 31M 153M 17% /boot
/dev/mapper/reiserfsVolumeGroup-lvol0
6.0G 33M 6.0G 1% /mnt/reiserfs

/*let’s extend the logical volume*/

[root@localhost ~]# lvextend -L+2G /dev/reiserfsVolumeGroup/lvol0
Extending logical volume lvol0 to 8.00 GiB
Logical volume lvol0 successfully resized

/*resize the file system (extend) */

[root@localhost ~]# resize_reiserfs /dev/reiserfsVolumeGroup/lvol0
resize_reiserfs 3.6.21 (2009 www.namesys.com)

ReiserFS report:
blocksize 4096
block count 2097152 (1572864)
free blocks 2088877 (1564605)
bitmap block count 64 (48)

Syncing..done

resize_reiserfs: Resizing finished successfully.

/*check the disk space again*/

[root@localhost ~]# mount /dev/reiserfsVolumeGroup/lvol0 /mnt/reiserfs/
[root@localhost ~]# df -h
Filesystem Size Used Avail Use% Mounted on
/dev/mapper/vg_bentoslack-bentoslack
30G 2.0G 28G 7% /
tmpfs 1.9G 0 1.9G 0% /dev/shm
/dev/sda1 194M 31M 153M 17% /boot
/dev/mapper/reiserfsVolumeGroup-lvol0
8.0G 33M 8.0G 1% /mnt/reiserfs

Finito! 😉

root@localhost ~]# lvdisplay
— Logical volume —
LV Path /dev/reiserfsVolumeGroup/lvol0
LV Name lvol0
VG Name reiserfsVolumeGroup
LV UUID b1135F-nX9k-6ofl-MvCT-jTNW-AgZC-aX8gGV
LV Write Access read/write
LV Creation host, time localhost.localdomain, 2013-07-03 08:21:31 -0400
LV Status available
# open 2
LV Size 8.00 GiB
Current LE 2048
Segments 1
Allocation inherit
Read ahead sectors auto
– currently set to 256
Block device 253:1

— Logical volume —
LV Path /dev/vg_bentoslack/bentoslack
LV Name bentoslack
VG Name vg_bentoslack
LV UUID TmzPUK-RJKN-xjRd-ydFs-uhaK-C1gk-QBtGvM
LV Write Access read/write
LV Creation host, time bentoslack, 2013-07-03 08:07:59 -0400
LV Status available
# open 1
LV Size 29.80 GiB
Current LE 7629
Segments 1
Allocation inherit
Read ahead sectors auto
– currently set to 256
Block device 253:0