
Category Archives: RAID
софтуерен райд – ребилдване
Seagate Barracuda ST2000DM001 общи проблеми с RAID масиви
pfsense инсталиран в райд mirror, и как да сменим повреден диск
kernel: INFO: task sadc:1716 blocked for more than 120 seconds.
Reply
FreeBSD 10 software raid 1 (mirror)
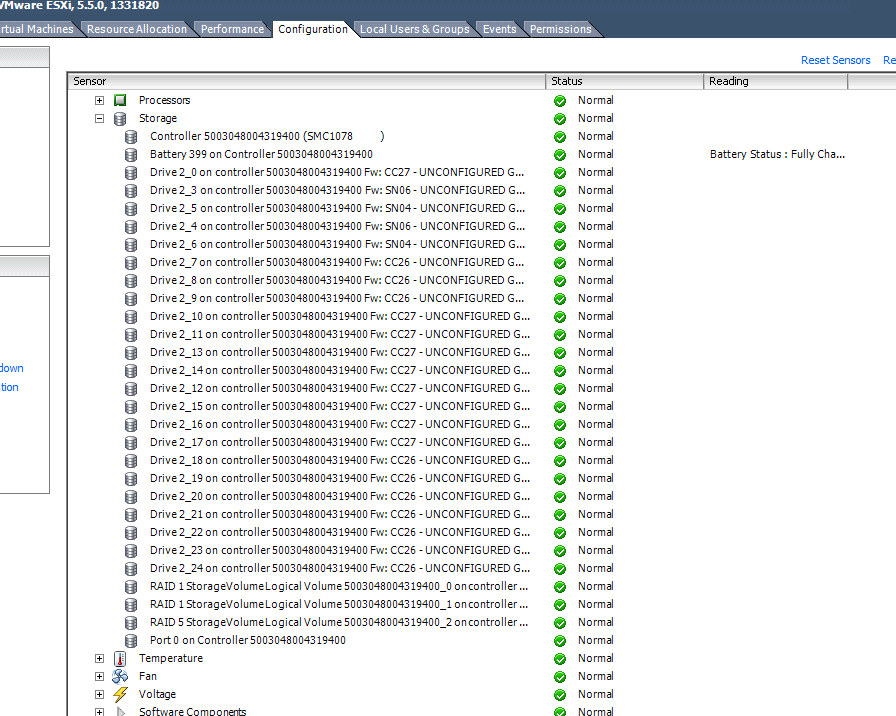
Monitoring LSI SMC1078 RAID Controller in VMware ESXi 5.5.0
Log in through ssh service and take a look of a raid controller model
~ # esxcfg-scsidevs -l | egrep -i 'display name|vendor'

Display Name: Local LSILOGIC Enclosure Svc Dev (mpx.vmhba2:C0:T2:L0)

Vendor: LSILOGIC Model: SASX36 A.0 Revis: 9

Display Name: Local USB CD-ROM (mpx.vmhba32:C0:T0:L0)

Vendor: AMI Model: Virtual CDROM Revis: 1.00

Display Name: Local USB Direct-Access (mpx.vmhba32:C0:T0:L1)

Vendor: AMI Model: Virtual Floppy Revis: 1.00

Display Name: Local LSI Disk (naa.6003048004319400196ff10f1cd9e340)

Vendor: LSI Model: SMC1078 Revis: 1.40

Display Name: Local LSI Disk (naa.6003048004319400196ff17d2365327d)

Vendor: LSI Model: SMC1078 Revis: 1.40

Display Name: Local LSI Disk (naa.60030480043194001a1cfe07181f1b2b)

Vendor: LSI Model: SMC1078 Revis: 1.40

~ #
We need to download VMware SMIS Provider, go to LSI web site and download it.
Other useful tool is MegaClI, go to the same link and download MegaCLI 5.5 P1 .Copy files to remote server.
scp vmware-esx-provider-lsiprovider.vib [email protected]:/vmfs/volumes/machines/ISO
scp vmware-esx-MegaCli-8.07.07.vib [email protected]:/vmfs/volumes/machines/ISO
Installation process
 esxcli software vib install --no-sig-check -v /vmfs/volumes/machines/ISO/vmware-esx-provider-lsiprovider.vib

esxcli software vib install --no-sig-check -v /vmfs/volumes/machines/ISO/vmware-esx-MegaCli-8.07.07.vib
Shutdown all virtual machines and reboot the esxi host, it will need about 30 minutes to update the storage information and the hard drives will appear in the healt status.
Some MegaCLI useful commands
cd /opt/lsi/MegaCLI #
Controller information
./MegaCli -AdpAllInfo -aALL

./MegaCli -CfgDsply -aALL
Enclosure information
./MegaCli -EncInfo -aALL
Virtual drive information
./MegaCli -LDInfo -Lall -aALL
Physical drive information
./MegaCli -PDList -aALL
check raid for errors
./MegaCli -LDInfo -Lall -aALL -NoLog | egrep -i "fail|degrad|error"
Monitoring HP RAID Controllers in VMware
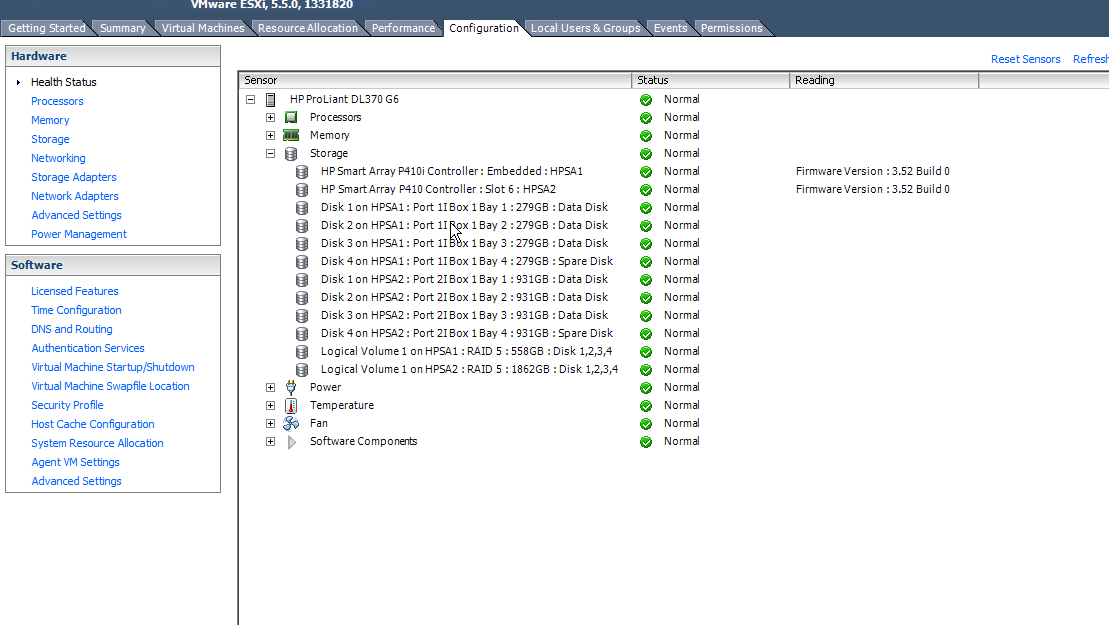
This article describes howto monitor HP Smart Array P410i through VMware, the server is HP ProLiant DL370 G6
We have to check our raid controller card model via VMware cli interface
~ # esxcfg-scsidevs -l | egrep -i 'display name|vendor'

Display Name: HP Serial Attached SCSI Disk (naa.600508b1001c842ab113318efbffeec6)

Vendor: HP        Model: LOGICAL VOLUME    Revis: 3.52

Display Name: HP Serial Attached SCSI Disk (naa.600508b1001ccfffd201e84a4d6706ac)

Vendor: HP        Model: LOGICAL VOLUME    Revis: 3.52

~ #
We need the following packages
hpsa-500-5.0.0-offline_bundle-933277.zip
hp-esxi5.5uX-bundle-1.5-27.zip
Go to official HP web site and download them
hpsa-500-5.0.0-offline_bundle-933277.zip
hp-esxi5.5uX-bundle-1.5-27.zip
Copy packages with scp
scp hp-esxi5.5uX-bundle-1.5-27.zip [email protected]:/vmfs/volumes/machines/ISO

scp hpsa-500-5.0.0-offline_bundle-933277.zip [email protected]:/vmfs/volumes/machines/ISO
Installation process
/vmfs/volumes/50112862-5388dcd2-a5a8-d48564610bc1/ISO # esxcli software vib install -d "/vmfs/volumes/machines/ISO/hpsa-500-5.0.0-offline_bundle-933277.zip"
Installation Result
Message: The update completed successfully, but the system needs to be rebooted for the changes to be effective.
Reboot Required: true
VIBs Installed: Hewlett-Packard_bootbank_scsi-hpsa_5.0.0-40OEM.500.0.0.472560
VIBs Removed: VMware_bootbank_scsi-hpsa_5.5.0-44vmw.550.0.0.1331820
VIBs Skipped:
~ # esxcli software vib install -d "/vmfs/volumes/machines/ISO/hp-esxi5.5uX-bundle-1.5-27.zip"
Installation Result
Message: The update completed successfully, but the system needs to be rebooted for the changes to be effective.
Reboot Required: true
VIBs Installed: Hewlett-Packard_bootbank_char-hpcru_5.5.4.1-1OEM.550.0.0.1198610, Hewlett-Packard_bootbank_char-hpilo_550.9.0.0.9-1OEM.550.0.0.1198611, Hewlett-Packard_bootbank_hp-ams_550.9.4.0-29.1198611, Hewlett-Packard_bootbank_hp-smx-provider_550.03.03.20.2-1198611
VIBs Removed:
VIBs Skipped:
~ # esxcli software vib list

Name                           Version                               Vendor           Acceptance Level  Install Date

-----------------------------  ------------------------------------  ---------------  ----------------  ------------

char-hpcru                     5.5.4.1-1OEM.550.0.0.1198610          Hewlett-Packard  PartnerSupported  2013-11-08

char-hpilo                     550.9.0.0.9-1OEM.550.0.0.1198611      Hewlett-Packard  PartnerSupported  2013-11-08

hp-ams                         550.9.4.0-29.1198611                  Hewlett-Packard  PartnerSupported  2013-11-08

hp-smx-provider                550.03.03.20.2-1198611                Hewlett-Packard  VMwareAccepted    2013-11-08

scsi-hpsa                      5.0.0-40OEM.500.0.0.472560            Hewlett-Packard  VMwareCertified   2013-11-08
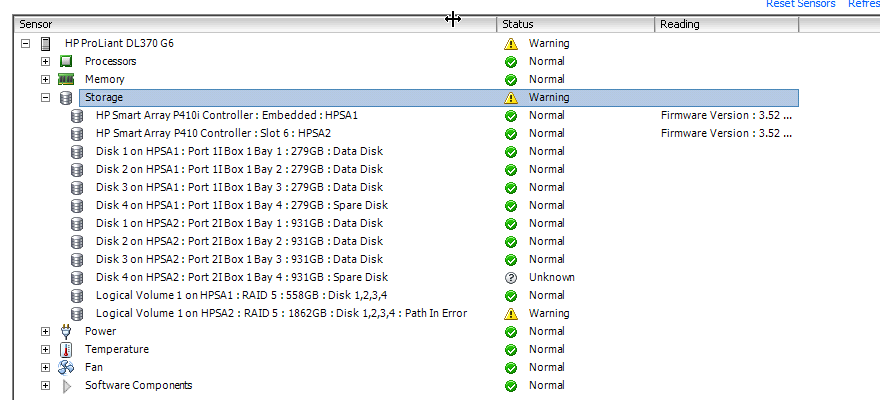
I will remove a hotspare disk,VMware notified about that
megacli monitor and configure LSI RAID controller
In this example i am using Debian 7 with raid controller LSI MEGA raid
It is necessary to add repository for the package:
Please add deb http://hwraid.le-vert.net/debian wheezy main to /etc/apt/sources.list
Then apt-get update && apt-get install megacli
megacli is a proprietary tool by LSI which can perform both reporting and management for MegaRAID SAS cards.
However it’s really hard to use because it’s use tones of command line parameters and there’s no documentation.
Gtestet all adapters status and config:
test:~# megacli -AdpAllInfo -aAll
Adapter #0
==============================================================================
Versions
================
Product Name : PERC 5/i Integrated
Serial No : 12345
FW Package Build: 5.2.1-0067
Mfg. Data
================
Mfg. Date : 00/00/00
Rework Date : 00/00/00
Revision No : @A
Battery FRU : N/A
Image Versions In Flash:
================
Boot Block Version : R.2.3.12
BIOS Version : MT28-8
MPT Version : MPTFW-00.10.61.00-IT
FW Version : 1.03.40-0316
WebBIOS Version : 1.03-04
Ctrl-R Version : 1.04-019A
[…]
Logical drive 0 on adapter 0 status and type:
test:~# megacli -LDInfo -L0 -a0
Adapter 0 — Virtual Drive Information:
Virtual Disk: 0 (Target Id: 0)
Name:raid1
RAID Level: Primary-1, Secondary-0, RAID Level Qualifier-0
Size:237824MB
State: Optimal
Stripe Size: 64kB
Number Of Drives:2
Span Depth:1
Default Cache Policy: WriteBack, ReadAheadNone, Direct, No Write Cache if Bad BBU
Current Cache Policy: WriteBack, ReadAheadNone, Direct, No Write Cache if Bad BBU
Access Policy: Read/Write
Disk Cache Policy: Disk’s Default
Exit Code: 0x00
Display, disable or enable automatic rebuild on adapter 0:
test:~# megacli -AdpAutoRbld -Dsply -a0
Adapter 0: AutoRebuild is Enabled.
Exit Code: 0x00
test:~# megacli -AdpAutoRbld -Dsbl -a0
Adapter 0: AutoRebuild is Disabled.
Exit Code: 0x00
test:~# megacli -AdpAutoRbld -Enbl -a0
Adapter 0: AutoRebuild is Enabled.
Exit Code: 0x00
Get and modify rebuild rate:
test:~# megacli -AdpGetProp RebuildRate -a0
Adapter 0: Rebuild Rate = 30%
Exit Code: 0x00
test:~# megacli -AdpSetProp RebuildRate 60 -a0
Adapter 0: Set rebuild rate to 60% success.
Exit Code: 0x00
Show physical disks from first controller:
test:~# megacli -PDList -a0
[…]
Enclosure Device ID: 32
Slot Number: 1
Device Id: 1
Sequence Number: 9
Media Error Count: 0
Other Error Count: 0
Predictive Failure Count: 0
Last Predictive Failure Event Seq Number: 0
PD Type: SAS
Raw Size: 140014MB [0x11177328 Sectors]
Non Coerced Size: 139502MB [0x11077328 Sectors]
Coerced Size: 139392MB [0x11040000 Sectors]
Firmware state: Rebuild
SAS Address(0): 0x5000c5000c8579d1
SAS Address(1): 0x0
Connected Port Number: 1(path0)
Inquiry Data: SEAGATE ST3146855SS S5283LN6CNGM
Foreign State: None
We can see that disk 32,1 (enclosure id = 32, slot = 1) is currently rebuilding (firmware state).
Let’s check this operation progress:
test:~# megacli -PDRbld -ShowProg -PhysDrv [32:1] -aALL
Rebuild Progress on Device at Enclosure 32, Slot 1 Completed 51% in 10 Minutes.
Auhtor:viliev
tw-cli monitor and configure 3ware Raid Controller
In this example i am using Debian 7 with raid controller 3ware 9500S-12 PCI SATA
It is necessary to add repository for the package:
Please add deb http://hwraid.le-vert.net/debian wheezy main to /etc/apt/sources.list
Then apt-get update && apt-get install tw-cli
tw_cli is a command line tool to manage and monitor Eskaled cards
Once the package is installed we can check how the raid works :
List available controllers:
server:~# tw-cli info
Ctl Model (V)Ports Drives Units NotOpt RRate VRate BBU
————————————————————————
c0 9500S-12 2 2 1 0 2 – –
All arrays and disks from controller “c0”:
server:~# tw-cli /c0 show
Unit UnitType Status %RCmpl %V/I/M Stripe Size(GB) Cache AVrfy
——————————————————————————
u0 RAID-1 OK – – – 153.385 OFF –
Port Status Unit Size Blocks Serial
—————————————————————
p0 OK u0 153.38 GB 321672960 VNRD3EC4C7J1SM
p1 OK u0 153.38 GB 321672960 VNRD3EC4C7HZZM
Enabling/Disabling Write Cache
//server> info c0
Unit UnitType Status %RCmpl %V/I/M Stripe Size(GB) Cache AVrfy
——————————————————————————
u0 RAID-1 OK – – – 232.885 OFF –
Write cache is OFF. Let’s turn it ON.
//server> set cache c0 u0 on
Setting Write Cache Policy on /c0/u0 to [on] … Done.
//server> info c0
Unit UnitType Status %RCmpl %V/I/M Stripe Size(GB) Cache AVrfy
——————————————————————————
u0 RAID-1 OK – – – 232.885 ON –
Author:viliev